Sticking Mechanism Categories and Preventation actions


  •  Solids Induced Pack-off
 Packing Off - First Actions
a) At the first signs of the drill string torquing up and trying to pack-off, the pump strokes should be reduced by half. This will minimise pressure trapped should the hole pack-off. Excessive pressure applied to a pack-off will aggravate the situation. If the hole cleans up, return flow to the normal rate.

b) If the string packs off, immediately stop the pumps and bleed down the standpipe pressure [NB not possible with a non-ported float valve]. When bleeding pressure down from under a pack-off, control the rate so as not to "U" tube solids into the drill string in case they plug the string.

c) Leave low pressure (<500 psi ) trapped below the pack-off. This will act as an indicator that the situation is improving should the pressure bleed off.

d) Holding a maximum of 500 psi on the standpipe and with the string hanging at its free rotating weight, start cycling the drill string up to maximum make-up torque. At this stage do not work the string up or down.

e) Continue cycling the torque, watching for pressure bleed off and returns at the shakers. If bleed off or partial circulation occurs, slowly increase pump strokes to maintain a maximum of 500 psi standpipe pressure. If circulation improves continue to increase the pump strokes.

f) If circulation cannot be regained, work the pipe between free up and free down weight. DO NOT APPLY EXCESSIVE PULLS AND SET DOWN WEIGHTS AS THIS WILL AGGRAVATE THE SITUATION (50k lb max). Whilst working the string continue to cycle the torque to stall out and maintain a maximum of 500 psi standpipe pressure.

g) DO NOT ATTEMPT TO FIRE THE JARS IN EITHER DIRECTION.

h) If circulation cannot be established increase the standpipe pressure in stages up to 1500 psi and continue to work the pipe and apply torque.

i) If the pipe is not free once full circulation is established, commence jarring operations in the opposite direction to the last pipe movement. Once the pipe is free rotate and clean the hole prior to continuing the trip.


  •  Unconsolidated formations
 Description

An unconsolidated formation falls into the well bore because it is loosely packed
with little or no bonding between particles, pebbles or boulders. Video clip of sand sloughing
The collapse of the formation is caused by removing the supporting rock as the well is drilled. This is very similar to digging a hole in sand on the beach, the faster you dig the faster the hole collapses. It happens in a well bore when little or no filter cake is present. The un-bonded formation (sand, gravel, small river bed boulders etc.) cannot be supported by hydrostatic overbalance as the fluid simply flows into the formation. Sand or gravel then falls into the hole and packs off the drill string. The effect can be a gradual increase in drag over a number of metres, or can be sudden. This mechanism is normally associated with shallow formations. Examples are shallow river bed structures at about 500m in the central North Sea and in surface hole sections of land wells. This mechanism normally occurs:
· While drilling shallow unconsolidated formations.
 Preventative Action

These formations need an adequate filter cake to help stabilise the formation. Seepage loss can be minimised with fine lost circulation material. If possible, avoid excessive circulating time with the BHA opposite unconsolidated formations to reduce hydraulic erosion. Spot a gel pill before POOH. Slow down tripping speed when the BHA is opposite unconsolidated formations to avoid mechanical damage.
Start and stop the pumps slowly to avoid pressure surges being applied to unconsolidated formations. Control-drill the suspected zone to allow time for the filter cake to build up, minimise annulus loading and resultant ECD’s. Use sweeps to help keep the hole clean. Be prepared for shaker, desilter and desander overloading. A method successfully used in the North Sea is to drill 10m, pull back to the top of the section and wait 10 minutes. Note
any fill on bottom when returning to drill ahead. If the fill is significant then ensure the process is repeated every 10m. It may be impossible to prevent the hole collapsing. If so let the hole stabilise itself with the BHA up out of harm’s way.
Rig site indications
· Increase in pump pressure.
· Fill on bottom.
· Overpull on connections.
· Shakers blinding.
 Freeing
Follow First Actions but be aware that the pressures (i.e. 500 psi, 1500 psi) will probably not be achievable in shallow
formations.


  • Mobile Formations


 Description
The mobile formation squeezes into the well bore because it is being compressed by the overburden forces. Mobile formations behave in a plastic manner, deforming under pressure. The deformation results in a decrease in the well bore size, causing problems running BHA’s, logging tools and casing. A deformation occurs because the mud weight is not sufficient to prevent the formation squeezing into the well bore. This mechanism normally occurs: · While drilling salt.

 Preventative Action

Maintain sufficient mud weight. Select an appropriate mud system that will not aggravate the mobile formation. Plan frequent reaming/wiper trips particularly for this section of the hole. Consider bi-centre PDC bits. Slow trip speed before BHA enters the suspected area. Minimise the open hole exposure time of these formations. With mobile salts consider using a slightly under-saturated mud system to allow a controlled washout.

 Rig site indications

· Overpull when moving up, takes weight when running in.
· Sticking occurs with BHA at mobile formation depth.
· Restricted circulation with BHA at mobile formation depth.

 Freeing

Spot a fresh water pill if in a salt formation. (Consider the effect on well control and on other open hole formations ). If moving up, apply torque and jar down with maximum trip load. If moving down, jar up with maximum trip load. Torque should not be applied while jarring up.

  • Fractured & Faulted Formations

 Description
A natural fracture system in the rock can often be found near faults. Rock near faults can be broken into large or small pieces. If they are loose they can fall into the well bore and jam the string in the hole. Even if the pieces are bonded together, impacts from the BHA due to drill string vibration can cause the formation to fall into the well bore. This type of sticking is particularly unusual in that stuck pipe can occur while drilling. When this has happened in the past, the first sign of a problem has been the string torquing up and sticking. There
is a risk of sticking in fractured / faulted formation when drilling through a fault and when drilling through fractured limestone formations.
This mechanism can occur:
· in tectonically active zones.
· in prognosed fractured limestone.
· as the formation is drilled.

 Preventative Action

Minimise drill string vibration. Choose an alternative RPM or change the BHA configuration if high shock vibrations are observed. Slow the trip speed before the BHA enters a suspected fractured/faulted area. Generally, fractured formations require time to stabilise. Be prepared to spend time when initially drilling and reaming prior to making significant further
progress. Circulate the hole clean before drilling ahead. Restrict tripping speed when BHA is opposite fractured formations and fault zones. Start / stop the drill string slowly to avoid pressure surges to the well bore. Anticipate reaming during trips. Ream fractured zones cautiously.
 
 Rig site indications.

· Hole fill on connections.
· Possible losses or gains.
· Fault damaged cavings at shakers.
· Sticking can be instantaneous.

 Freeing

If packed off while off bottom then follow First Actions. Otherwise JAR UP in an effort to break up formation debris. Use every effort to maintain circulation. Circulate high density viscous sweeps to clean debris. Spot acid if stuck in limestone

  • Naturally Over-Pressured Shale Collapse


 Description
A naturally over-pressured shale is one with a natural pore pressure greater than the normal hydrostatic pressure gradient. Naturally over-pressured shales are most commonly caused by geological phenomena such as under-compaction, naturally removed overburden (i.e.
weathering ) and uplift. Using insufficient mud weight in these formations will cause the hole to become unstable and collapse.
This mechanism normally occurs in:
· Prognosed rapid depositional shale sequences.
 Preventative action
Ensure planned mud weight is adequate. Plan to minimise hole exposure time. Rigorous use of gas levels to detect pore pressure trends. Use of other information to predict pore pressure trends (for example Dexp ). Once the shale has been exposed do not reduce the mud weight. It may also be the case that the mud weight will need to be raised with an increase in inclination See Well bore stability Section of SP KB 1997 Guidelines.
 Rig site indications
· Cavings (splintery) at shakers.
· Increased torque and drag.
· Gas levels, D exponent.
· Circulation restricted or impossible.
· Hole fill.
· An increase in ROP.
· Cuttings and cavings are not hydrated or mushy.
 Freeing
Follow First Actions.


  •  Induced Over-Pressured Shale Collapse


 Description
Induced over-pressure shale occurs when the shale assumes the hydrostatic pressure of the well bore fluids after a number of days exposure to that pressure. When this is followed by no increase or a reduction in hydrostatic pressure in the well bore, the shale, which now has a higher internal pressure than the well bore, collapses in a similar manner to naturally over-pressured shale. Video clip - Unstable Shale in WBM
This mechanism normally occurs:
· In WBM.
· After a reduction in mud weight or after a long exposure time during which
the mud weight was constant.
· In the casing rat hole.
 Preventative action
Non water based muds prevent inducing over-pressure in shale. Do not plan a reduction in mud weight after exposing shale. If cavings occur, utilise good hole cleaning practices. See Hole Cleaning Section
 Rig site indications
· Cuttings / cavings show no sign of hydration.
· Cavings (splintery) at shakers.
· Tight hole in casing rat hole.
· Increased torque and drag.
· Circulating restricted or impossible.
· Hole fill.
1.2.6.4 Freeing
Follow First Actions.

  • Reactive Formations


 Description
A water sensitive shale is drilled with less inhibition than is required. The shale absorbs the water and swells into the well bore. The reaction is ‘time dependent’, as the chemical reaction takes time to occur. However, the time can range from hours to days.
This mechanism normally occurs:
· When using WBM in shales and clays in young formations.
· When drilling with an incorrect mud specification. Particularly, an
insufficient concentration of inhibition additives in OBM and WBM such as
salts (KCl, CaCL), glycol and polymer.
 Preventative action
Use an inhibited mud system. Maintain the mud properties as planned. The addition of various salts (potassium, sodium, calcium, etc. ) will reduce the chemical attraction of the water to the shale. Various encapsulating (coating) polymers can be added to WBM mud to reduce water contact with the shale. Monitoring mud properties is the key to detection of this problem. Open hole time in shale should be minimised. Regular wiper trips or reaming trips may help if shales begin to swell. The frequency should be based on exposure time or warning signs of reactive shales. Ensure hole cleaning is adequate to clean excess formation i.e. clay balls, low gravity solids etc.
 Rig site indications
· Hydrated or mushy cavings.
· Shakers screens blind off, clay balls form.
· Increase in LGS, filter cake thickness, PV, YP, MBT.
· An increase or fluctuations in pump pressure.
· Generally occurs while POOH.
· Circulation is impossible or highly restricted.
Freeing
POH slowly to prevent swabbing. See First Actions.


  • Hole Cleaning


 Description
In deviated wells cuttings and cavings settle to the low side of the hole and form layers called solids beds or cuttings beds. The BHA becomes stuck in the solids bed.
OR Cuttings and cavings slide down the annulus when the pumps are turned off and pack-off the drill string. Avalanching can also occur while the pumps are on.
Good hole cleaning means removal of sufficient solids from the well bore to allow the reasonably unhindered passage of the drill string and the casing.
There are several main reasons for solids not being cleaned out of the well bore.
These are:
· A low annular flow rate.
· Inappropriate mud properties.
· Insufficient circulation time.
· Inadequate mechanical agitation.
If any of the above are missing good hole cleaning will be very unlikely. In 40-65 degree wells the cuttings bed will slide down the low side of the hole. This can happen while pumping, not just when the pumps are off. In highly deviated wells of 65 degrees or more cuttings settle very quickly in spite of high flow rates. This is known as
avalanching. A cuttings bed of 10% of the hole diameter (1.75 inches in 17.5 inch hole) looks harmless enough. Add a drill string and the situation looks very different.
Cuttings beds can also increase drag in the well and cause problems with applying WOB in horizontal holes.
Preventative Action
· Maximise the annular velocity.
- Consider the use of a third mud pump.
- Consider using larger drill pipe.
· Ensure circulation times are adequate.
- Consult the hole cleaning charts for confirmation.
- Monitor the cuttings returns at the shakers.
· Maximise mechanical agitation of cuttings beds.
- Rotation.
- Reciprocation.
· Optimise mud properties.
- increase YP in near vertical wells.
Rig site indications· Overpulls increasing while POOH from TD in deviated hole (7-10 stands).
· Erratic pump pressure.
· Poor weight transfer to bit.
· Difficulty orienting toolface.
· Absence of returns at shakers.
· Presence of re-ground cuttings (LGS).
· Overpulls inside casing.
 Freeing
See First Actions
Refer to Hole Cleaning section for more information.


  • Tectonically Stressed Formations


 DescriptionWell bore instability is caused when highly stressed formations are drilled and there exists a significant difference between the near well bore stress and the restraining pressure provided by the drilling fluid density. Tectonic stresses build up in areas where rock is being compressed or stretched due to movement of the earth’s crust. The rock in these areas is
being buckled by the pressure of moving tectonic plates. When a hole is drilled in an area of high tectonic stresses the rock around the well bore will collapse into the well bore and produce splintery cavings similar to those produced by over-pressured shale. In the tectonic stress case the hydrostatic pressure required to stabilise the well bore may be much higher
than the fracture pressure of the other exposed formations
This mechanism usually occurs:
· in or near mountainous regions.
 Preventative action
Plan to case off these formations as quickly as possible. Maintain mud weight within planned mud weight window. Well bore instability shows itself as a hole cleaning problem. If possible drill these formations in smaller hole sizes. This will minimise the impact of a hole cleaning problem. Ensure that the circulation system is capable of handling the additional volume of cavings often associated with this mechanism. If hole problems do occur, Ref Hole Cleaning section. Use offset data to establish optimum inclination and azimuth as these are key factors in reducing the extent of the problem. Ref Wellbore Stability section in  Rig site indicators
· Pack-offs and bridges may occur.
· Cavings at the shakers (splintery).
· Increase torque and drag.
· If stuck, circulation is likely to be impaired or non-existent.
· Increase in volume of returns at the shakers relative to the hole volume drilled.
 Freeing
See First Actions

CATALYTIC CRACKING

INTRODUCTION

Fluid catalytic cracking (FCC) technology is a technology with more than 60 years of commercial operating experience. The process is used to convert higher-molecular-weight hydrocarbons to lighter, more valuable products through contact with a powdered catalyst at appropriate conditions. Historically, the primary purpose of the FCC process has been to produce gasoline, distillate, and C3/C4 olefins from low-value excess refinery gas oils and heavier refinery streams. FCC is often the heart of a modern refinery because of its adaptability to changing feedstocks and product demands and because of high margins that
exist between the FCC feedstocks and converted FCC products. As oil refining has evolved
over the last 60 years, the FCC process has evolved with it, meeting the challenges of cracking heavier, more contaminated feedstocks, increasing operating flexibility, accommodating environmental legislation, and maximizing reliability.
The FCC unit continuously circulates a fluidized zeolite catalyst that allows rapid
cracking reactions to occur in the vapor phase. The KBR Orthoflow FCC unit (Fig. 3.1.1)
consists of a stacked disengager-regenerator system that minimizes plot space requirements. The cracking reactions are carried out in an up-flowing vertical reactor-riser in
which a liquid oil stream contacts hot powdered catalyst. The oil vaporizes and cracks to
lighter products as it moves up the riser and carries the catalyst along with it. The reactions
are rapid, requiring only a few seconds of contact time. Simultaneously with the desired
reactions, coke, a material having a low ratio of hydrogen to carbon, deposits on the catalyst
and renders it less catalytically active. Catalyst and product vapors separate in a disengaging vessel with the catalyst continuing first through a stripping stage and second
through a regeneration stage where coke is combusted to rejuvenate the catalyst and provide heat for operation of the process. The regenerated catalyst then passes to the bottom of the reactor-riser, where the cycle starts again. Hydrocarbon product vapors flow downstream for separation into individual products.
KBR, through its ancestry in The M.W. Kellogg Company, has been a leader in FCC
technology developments since the inception of the process. In recent years, KBR has
worked with its FCC partner, ExxonMobil, to create and refine FCC technology features
that have led the industry. To date, KBR has licensed more than 120 grassroots FCC


units throughout the world, including 13 grassroots units and more than 120 revamps
since just 1990.
FEEDSTOCKS

The modern FCC unit can accept a broad range of feedstocks, a fact which contributes to
FCC’s reputation as one of the most flexible refining processes in use today. Examples of
common feedstocks for conventional distillate feed FCC units are
● Atmospheric gas oils
● Vacuum gas oils
● Coker gas oils
● Thermally cracked gas oils
● Solvent deasphalted oils
● Lube extracts
● Hydrocracker bottoms

Residual FCCU (RFCCU) processes Conradson carbon residue and metals-contaminated
feedstocks such as atmospheric residues or mixtures of vacuum residue and gas oils.
Depending on the level of carbon residue and metallic contaminants (nickel and vanadium),
these feedstocks may be hydrotreated or deasphalted before being fed to an RFCCU.
Feed hydrotreating or deasphalting reduces the carbon residue and metals levels of the
feed, reducing both the coke-making tendency of the feed and catalyst deactivation.
PRODUCTS
Products from the FCC and RFCC processes are typically as follows:
● Fuel gas (ethane and lighter hydrocarbons)
● C3 and C4 liquefied petroleum gas (LPG)
● Gasoline
● Light cycle oil (LCO)
● Fractionator bottoms (slurry oil)
● Coke (combusted in regenerator)
● Hydrogen Sulfide (from amine regeneration)

Although gasoline is typically the most desired product from an FCCU or RFCCU, design
and operating variables can be adjusted to maximize other products. The three principal
modes of FCC operation are (1) maximum gasoline production, (2) maximum light cycle
oil production, and (3) maximum light olefin production, often referred to as maximum
LPG operation. These modes of operation are discussed below:
Maximum Gasoline The maximum gasoline mode is characterized by use of an intermediate cracking temperature (510 to 540°C), high catalyst activity, and a high catalyst/oil ratio. Recycle is normally not used since the conversion after a single pass through the riser is already high. Maximization of gasoline yield requires the use of an effective feed injection system, a short-contact-time vertical riser, and efficient riser effluent separation to maximize the cracking selectivity to gasoline in the riser and to prevent secondary reactions from degrading the gasoline after it exits the riser.
Maximum Middle Distillate The maximum middle distillate mode of operation is a low-cracking-severity operation in which the first pass conversion is held to a low level to restrict recracking of light cycle oil formed during initial cracking. Severity is lowered by reducing the riser outlet temperature (below 510°C) and by reducing the catalyst/oil ratio. The lower catalyst/oil ratio is often achieved by the use of a fired feed heater which significantly increases feed temperature. Additionally catalyst activity is sometimes lowered by reducing the fresh catalyst makeup rate or reducing fresh catalyst activity. Since during low-severity operation a substantial portion of the feed remains unconverted in a single pass through the riser, recycle of heavy cycle oil to the riser is used to reduce the yield of lower-value, heavy streams such as slurry product. When middle distillate production is maximized, upstream crude distillation units are operated to minimize middle distillate components in the FCCU feedstock, since these components either degrade in quality or convert to gasoline and lighter products in the FCCU. In addition, while maximizing middle distillate production, the FCCU gasoline endpoint would typically be minimized within middle distillate flash point constraints, shifting gasoline product into LCO.
If it is desirable to increase gasoline octane or increase LPG yield while also maximizing
LCO production, ZSM-5 containing catalyst additives can be used. ZSM-5 selectively
cracks gasoline boiling-range linear molecules and has the effect of increasing gasoline
research and motor octane ratings, decreasing gasoline yield, and increasing C3 and C4
LPG yield. Light cycle oil yield is also reduced slightly.
Maximum Light Olefin Yield
The yields of propylene and butylenes may be increased above that of the maximum gasoline operation by increasing the riser temperature above 540°C and by use of ZSM-5 containing catalyst additives. The FCC unit may also be designed specifically to allow
maximization of propylene as well as ethylene production by incorporation of MAXOFIN
FCC technology, as described more fully in the next section. While traditional FCC operations typically produce less than 6 wt % propylene, the MAXOFIN FCC process can produce as much as 20 wt % or more propylene from traditional FCC feedstocks. The process increases propylene yield relative to that produced by conventional FCC units by combining the effects of MAXOFIN-3 catalyst additive and proprietary hardware, including a second high-severity riser designed to crack surplus naphtha and C4’s into incremental light
olefins. Table 3.1.1 shows the yield flexibility of the MAXOFIN FCC process that can
alternate between maximum propylene and traditional FCC operations.

PROCESS DESCRIPTION

The FCC process may be divided into several major sections, including the converter section, flue gas section, main fractionator section, and vapor recovery units (VRUs). The
number of product streams, the degree of product fractionation, flue gas handling steps,
and several other aspects of the process will vary from unit to unit, depending on the
requirements of the application. The following sections provide more detailed descriptions
of the converter, flue gas train, main fractionator, and VRU.
Converter
The KBR Orthoflow FCCU converter shown in Fig. 3.1.2 consists of regenerator, stripper,
and disengager vessels, with continuous closed-loop catalyst circulation between the
regenerator and disengager/stripper. The term Orthoflow derives from the in-line stacked
arrangement of the disengager and stripper over the regenerator. This arrangement has the
following operational and cost advantages:
● Essentially all-vertical flow of catalyst in standpipes and risers
● Short regenerated and spent catalyst standpipes allowing robust catalyst circulation
● Uniform distribution of spent catalyst in the stripper and regenerator
● Low overall converter height
● Minimum structural steel and plot area requirements
Preheated fresh feedstock, plus any recycle feed, is charged to the base of the riser reactor.
Upon contact with hot regenerated catalyst, the feedstock is vaporized and converted to lower boiling fractions (light cycle oil, gasoline, C3 and C4 LPG, and dry gas). Product vapors are separated from spent catalyst in the disengager cyclones and flow via the disengager
overhead line to the main fractionator and vapor recovery unit for quenching and fractionation.
Coke formed during the cracking reactions is deposited on the catalyst, thereby reducing
its activity. The coked catalyst, which is separated from the reactor products in the
disengager cyclones, flows via the stripper and spent catalyst standpipe to the regenerator.
The discharge rate from the standpipe is controlled by the spent catalyst plug valve.
In the regenerator, coke is removed from the spent catalyst by combustion with air. Air
is supplied to the regenerator air distributors from an air blower. Flue gas from the combustion of coke exits the regenerator through two-stage cyclones which remove all but a
trace of catalyst from the flue gas. Flue gas is collected in an external plenum chamber and
flows to the flue gas train. Regenerated catalyst, with its activity restored, is returned to the
riser via the regenerated catalyst plug valve, completing the cycle.

 ATOMAX Feed Injection System
The Orthoflow FCC design employs a regenerated catalyst standpipe, a catalyst plug
valve, and a short inclined lateral to transport regenerated catalyst from the regenerator to
the riser. The catalyst then enters a feed injection cone surrounded by multiple, flat-spray, atomizing feed injection nozzles, as shown in Fig. 3.1.3. The flat, fan-shaped sprays provide
uniform coverage and maximum penetration of feedstock into catalyst, and prevent catalyst
from bypassing feed in the injection zone. Proprietary feed injection nozzles, known
as ATOMAX nozzles, are used to achieve the desired feed atomization and spray pattern
while minimizing feed pressure requirements. The hot regenerated catalyst vaporizes the
oil feed, raises it to reaction temperature, and supplies the necessary heat for cracking.
The cracking reaction proceeds as the catalyst and vapor mixture flow up the riser. The
riser outlet temperature is controlled by the amount of catalyst admitted to the riser by the
catalyst plug valve.

Riser Quench
The riser quench system consists of a series of nozzles uniformly spaced around the upper
section of riser. A portion of the feed or a recycle stream from the main fractionator is
injected through the nozzles into the riser to rapidly reduce the temperature of the riser
contents. The heat required to vaporize the quench is supplied by increased fresh feed preheat or by increased catalyst circulation. This effectively increases the temperature in the
lower section of the riser above that which would be achieved in a nonquenched operation,
thereby increasing the vaporization of heavy feeds, increasing gasoline yield, olefin production, and gasoline octane.
Riser Termination
At the top of the riser, all the selective cracking reactions have been completed. It is important to minimize product vapor residence time in the disengager to prevent unwanted thermal or catalytic cracking reactions which produce dry gas and coke from more valuable
products. Figure 3.1.4 shows the strong effect of temperature on thermal recracking of
gasoline and distillate to produce predominantly dry gas.
Closed cyclone technology is used to separate product vapors from catalyst with minimum
vapor residence time in the disengager. This system (Fig. 3.1.5) consists of riser
cyclones directly coupled to secondary cyclones housed in the disengager vessel. The riser
cyclones effect a quick separation of the spent catalyst and product vapors exiting the
riser. The vapors flow directly from the outlet of the riser cyclones into the inlets of the


secondary cyclones and then to the main fractionator for rapid quenching. Closed cyclones
almost completely eliminate postriser thermal cracking with its associated dry gas and
butadiene production. Closed cyclone technology is particularly important in operation at
high riser temperatures (say, 538°C or higher), typical of maximum gasoline or maximum
light olefin operations.


Chapter 2: Casing Design con't lec (10 )


Cementing

Cementing a liner in place requires very closely controlled application of existing technology4s46 and a fair amount of risk. Three cementing methods are generally accepted for liners.47 Calculating the volume of cement to be used in a liner cementing job is extremely difficult and requires more information than available from a simple caliper run. For maximum caliper information, a four arm device capable of determining elliptical holes should be utilized for hole volume. Cement excesses of between 20% and 100% have been used on a number of liner jobs with larger excesses being responsible for better bonding and less channels. There is also a direct correlation with absence of channels and pipe movement. In liners of 500 ft or less, Bowman and Sherer4s46 recommend 100% excess
over the calculated annular volume and on liners of 3000 ft or more at least a 30% excess is recommended. A single-stage cementing job in which cement is circulated to the top of a liner; much like a


primary cement job and may include pipe movement during cementing. A planned squeeze program in which the lower part of the liner is cemented and the top part of the liner is squeezed later. This technique does not have good middle support and should not be used to isolate high pressure zones. The procedure is more widely followed in worldwide operations because of perceived problems of disengaging the liner running assembly from the liner and of flash setting of cement. Disengaging from the liner before cementing eliminates the ability to move the liner and almost universally results in poor cement jobs.
A third procedure commonly reserved for short liners is to fill part of the hole with cement and then slowly run the casing string into the cement, forcing the cement to flow up around the pipe. While this method can be accomplished with the minimum amount of pumping, the lack of circulation can result in poor removal of drilling mud. The technique is called a puddle job. Most liner jobs do not include plans to move the liner during the primary ~ e m e n t i n g .T~h~e ?re~as~o ns for this include:
1. Detaching the drill pipe from the liner before cementing minimizes the risk of being unable to detach from the liner once the cement is in place.
2. It may be necessary to change to a higher strength drillstring to allow pipe movement.
3. Movement may cause the liner hanger to become tangled with the centralizers near the top of the string.
4. Swab or surge pressures may be created during liner movement, especially in close tolerance wellbores.
5. Movement of the liner during cementing may knock off debris from the borehole wall. The debris may cause bridges and reduce the possibility of circulating cement. Despite the quoted disadvantages of staying attached during the cementing operation, Bowman and
Sherer4346 site several serious disadvantages with releasing the liner before cementing.

1. If the liner is hung off, the small bypass area around the liner offers a greater restriction to flow and causes more lost circulation because of the backpressure on the flowing cement.
2. If a downhole rotating liner hanger is used (rotation only), additional torque is required to initiate rotation to overcome bearing friction. Pipe often rotates easier when it is being raised or lowered. The difference in torque required is often substantial.
3. The potential for sloughing shale and annulus bridging is lessened when the operator can alternate between rotation and reciprocation.
4. Premature shearing of the pins in the liner-wiper plug is less likely because there is no relative movement between the liner and the setting tool (these two pieces of equipment move together). 49
5. If cement channels and there is a large hydrostatic pressure difference between inside and outside of the running tools, the cups or seals can give way before cementing of the liner is complete.
6. The displacement efficiency of cement around the tubulars when pipe is not moved is lessened. When liners are close clearance, then the density differences between mud and cement should be as close as possible. This negates the advantages of hole cleaning by higher density cement. Reciprocation4’ of the string is helpful because it produces lateral pipe movement that causes the pipe to change sides in the wellbore while it is alternately compressed and stretched (slacked off and picked up).43 R o t a t i ~ hnelp~s b~y ~mix~in~g th~e ~cem ent into wellbore irregularities and displacing mud due to drag forces produced by the flowing cement.43 Although liner movement should be a goal in any liner operation, well conditions may prevent any type of movement. In many cases, however, liner movement can be achieved in a well conditioned hole. Two clear cases where liner should not be moved are:43
1. When a short or small liner (3-1/2 in. or smaller) is run in a deep well, the liner should be hung off first since it may be impossible to tell from the weight indicator whether the liner had been released from the drill pipe.
2. In cases of hole deviation over 35O, reciprocation may be difficult due to high drag forces.
Many of the problems in liner running can be lessened by drilling a usable hole. Problems with keyseats, ledges, washouts, and other nongauge problems intensify when close tolerance liners are to be run. For additional information on problems involved in drilling a usable hole, refer to the chapter on Drilling The Pay.
When cement is circulated from the liner bottom to over the liner top, the cement must remain fluid long enough to detach from the liner and to circulate the cement from the well or to pull up above the top of the cement with the drillstring. If the cement flash sets, then the drillstring will become cemented in place and the hole most likely will be lost. Cement may prematurely set, thicken, or cement circulation may be lost for a number of reasons
1. Improper thickening or pump times caused by a poor design, ineffective field operations, or bad test results.
2. Poor density control on the cement or poor mixing of the cement at the surface. ,
3. Bridging in the annulus caused by a buildup of cuttings. This is caused typically by the increased number of particles picked up by higher annular velocities with a liner in the hole (due to its larger ID) than around the drillstring.
4. Plugging from dehydration of cement caused by excessive water loss in openhole sections below the overlap.
5. Increased hole cleaning of the cement as compared to4he drilling mud.
One of the most troublesome problems in cementing design is inadequate hole cleaning prior to cementing. This is especially true when light weight, low viscosity muds are used and little attention is paid to cuttings removal. Heaving shales are also a problem in hole fill and may cause washouts. Under no circumstances should circulation be halted with the liner in the hole before all of the cement has been displaced. Due to the small clearances and the yield point of cement, it may be very difficult to start circulation again.

Chapter 2: Casing Design con't lec ( 9 )

Casing String Design - Deviated Wells
The basic difference in casing design for a deviated well is the magnitude of the loads encountered in the deviated or angle build section. This requires bending and torque considerations. Greenip offers three major points for consideration:
1. Axial and torque loads can be estimated by analyzing separate sections.
2. Relationships can be developed for various parameters in casing string design.
3. The pickup, set down, and neutral states produce sufficiently different loads and magnitudes to analyze each separately.
First, divide the string into three segments, (1) the extension or reach interval, (2) the build interval (containing the deviation) and (3) the vertical interval, Figure 2.20. As with conventional casing design, the casing in a horizontal well is designed from the bottom up. Interval (2), the build interval, is simplified by assuming the angle is constant. Interval (l), the extension or reach portion is assumed to be a constant inclination. An example of the magnitude of the forces at pickup, neutral and set down are shown in Figure 2.21.


Liner Design

A liner is a casing string that does not extend back to surface. Liners may be permanent or temporary and run for a variety of reason^:^*^^^
1. Wear protection of the permanent casing string from rotating drill pipe or frequent tubing movement, especially in a deviated section.
2. Correction of hole difficulty such as doglegs, Key seats, or ledges.
3. Zone isolation of a high pressure zone or a lost circulation zone.
4. As an economical alternative to a full casing string.
5. To allow adequate room above the liner top for a large diameter pump.
6. To reduce casing tension loads in deep wells or to allow use of an available, low strength connection.
7. For repair of leaks or buckled casing.
8. For casing strengthening in earth shift zones.
Most reasons for liner design incorporate the cost reduction factor of not running casing back to surface. Liners have drawbacks as well, including several problems related to liner cementing. From a design standpoint, perhaps the biggest concern is that the intermediate string or the last full string becomes the top part of the liner and must handle the burst force generated by the zones crossed by the liner. Before a decision is made on use of a liner, the strength of the top part of the last full string must be checked against the new maximum expected surface pressure. Unless proven otherwise by cement bond evaluation tools, the upper pipe strength alone (no assistance from the cement sheath) must be capable of withstanding the pressure. If the upper section will not withstand the forces, it should be protected by running a full string, or, the string should be run before perforating the well.
The first approach liner design is the same as for full casing strings. The collapse, burst, and tension safety factors and design equations are the same. The basic differences between liner and casing design come to light in the design of liners for deep wells, hot  environments, and very high pressure zones.

Burst failure of liners is usually caused by kicks while drilling below a liner,39p40 pressure when fracture stimulating, or a tubing leak while producing a deep, high pressure zone. All these factors are made worse by a poor cement job. Since filling the casing/openhole annulus with cement significantly strengthens and supports the pipe, a good cement job over high pressure or earth movement zones is a requirement in any deep well.
An illustration of the complications caused by a poor cement job 39*40 is illustrated in Figure 2.22. After a primary cement job on the 9-5/8 in. string, the 6-518 in. liner is run and a circulation cement job is initiated. The low pressure zone at 13,800 breaks down while cementing, returns are lost and the cement top peaks at 13,400 (Figure 2.23a). A top squeeze with cement seals the top of the liner but leaves an uncemented zone from 13,120 ft to 13,400 ft (Figure 2.23b). While drilling near TD to test a deep structure, the temperature of the mud goes from 270" (temp. of the zone at 15,400 ft) to the bottomhole temperature (at 18,500 ft) of 345°F. Since both ends of the liner are cemented, stress will be induced by the temperature rise


Liner Tie-Backs

Although the liner completion described in Figure 2.22 may be used only as a liner, there are some conditions when the liner may be run back to surface. This liner tie-back may be temporary, to protect


permanent casing strings from wear during drilling4' or permanently, with cement, to strengthen the casing string through a high pressure zone or isolate and stop a casing leak38 or a leaking liner top.42 To allow a tie-back, most liners are equipped with a liner tie-back receptacle. The receptacle is an internally polished receiver that will accept the seal assembly of the tie-back liner. The tie-back liner usually incorporates some type of cement port or sliding sleeve and seat that will allow cement to be circulated through to the annulus and up the annulus to surface. The seat, float equipment andlor plugs used in the cementing operation are of drillable material.


Chapter 2: Casing Design con't lec ( 8 )


Casing String Design
A complex solution (API method) requiring computer solution is discussed first, followed by a practical, hand calculated method.

API Equations

Collapse strength rating is the external pressure required to collapse the casing. There are several methods for designing casing strings that will produce an acceptable casing design. Most methods use an x-diagram graphical approach or a calculated design based on a single strength concern in each area of design. The API procedure recognizes the changes in steel behavior in elastic, transition, plastic, and ultimate yield. The procedure illustrated here for determining the collapse strength is defined in API Bulletin 5C3.15 This casing design section is merely an introduction to the process. For a complete treatment, refer to Rabia's Fundamentals of Casing Design.14 When exposed to external pressure from mud or reservoir fluids and the effects of axial tension from the weight of the casing below any point (plus other loads)," a piece of casing may fail in one of three possible collapse  mechanisms: elastic collapse, plastic collapse, and failure by exceeding the ultimate
strength of the material. Each failure mode is bounded by limits of the ratio of casing diameter to thickness, plus a transition collapse formula was added arbitrarily since the API minimum elastic and rninimum plastic curves do not intersect. The transition formula covers this area. The API minimum collapse resistance equations are shown in Figure 2.12.15


Axial loads generally result from two forces:
1. hanging weight of the casing string
2. temperature induced forces in thermal wells and in nonthermal wells where operating temperatures may change by over 100°F.

Buoyancy


When the hole is filled with cement or mud, there is a buoyancy force exerted on the casing by the fluid in the hole and opposed by the fluid in the casing. Buoyant force acts on the entire casing string and results in a reduction in hanging weight. The amount of buoyant force exerted by the mud is equal . to the weight of the mud displaced by the submerged casing. The weight of steel at 489.5 Ib/ft3 or 65.4 Ib/gal, is several times the heaviest mud weight, yet the buoyant contribution of the mud is a significant factor in the hook load during running and cementing of the casing. Hook loads change dramatically during running and cementing operations and conditions do exist (running closed end casing, dry) where hook load could diminish to zero (the casing floats).
Buoyant weight, Wb, for an open-ended casing string of air weight W,, filled and surrounded by one fluid. is:


When the fluid in the casing is different from the fluid outside the casing, the volumes contained in the casing and displaced by the casing must be calculated and the weights summed against the air weight of the casing.
For the special case of an additional surface pressure such as holding pressure on the mud in the casing while cement sets in the annulus, the surface pressure is incorporated with the load produced by the mud. The buoyant force, FB, applied to the air weight of the casing becomes:


The pressure terms affect buoyancy much the same way as pressure affects tubing forces.

Collapse Design - Non-API Method

A practical method that considers burst, collapse, and tensile forces is also available. This method may be worked by equations or by graphical methods. The design is conservative in collapse resistance because of the basic assumptions of an empty string in a hole full of mud. In practice, most casing strings are filled with mud as they are run. The design begins at the bottom of the string. The collapse force produced by fluid pressure from a homogeneous fluid in the well and an empty casing string is:


resistance of the inner string. It may also be used in some casing designs. Because outside surface pressure is rare, the term is generally dropped.
It is customary to design the primary strings for the worst possible case. Since the worst possible case will be when the pipe is empty, the equation reduces to:


The outside surface pressure is assumed to be zero.
The design on an empty pipe string may seem excessive but it is done to eliminate consideration of triaxial forces produced by hole irregularities and other factors3 The worst possible case design, therefore, covers a multitude of other forces. Because of buoyancy produced by changes in axial load following setting of the cement, portions of the casing string may be in compression rather than tension. Casing above the point of zero axial tension has less collapse resistance, and casing below the point of zero axial tension has more collapse resistance since it is in compression. The collapse forces on a casing are usually visualized as being applied by the pressure of the mud in which the string is 
run. The effect of tension in reducing the collapse strength of the casing is generally considered, but the effects of ballooning, ovality, and temperature changes during circulating are often neglected. These effects can be severe, especially in high collapse resistance casing such as some 95-grades. For the burst calculations, one of two API approved formulas may be used. For plain end (nonthreaded) pipe and pipe with premium couplings (couplings stronger than the pipe body), Barrow's formula is used.


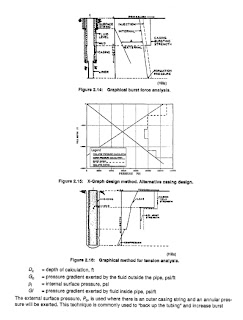
Burst force design may also be considered graphically, Figure 2.14.35 Eqn. 2.26 can be used to make the start of the X diagram of Figure 2.1 5. The X diagram is constructed
by collapse and burst c a l c ~ l a t i o n s . ’T~h~e ~m~a ximum burst line is drawn between the calculated burst at the surface and the calculated burst at the casing shoe. The collapse line is drawn between U and the maximum collapse pressure at the casing shoe, calculated by Eqn. 2.24 or 2.25. Tension design is the last step for each section of the casing string. The top of each section should be checked to see that the tensile ratings are not exceeded. The common safety factor is 1.6 to 1.8. When the tensile limits are exceeded, a change to a higher strength joint should be made. Tension limits may be gathered from a table of casing properties or calculated by dividing the API 5C3 value for joint strength by the safety factor

Chapter 2: Casing Design con't lec ( 7 )


Casing Weights and Grades
Common casing diameters range from less than 4-1/2 in. to over 20 in., and common tubing sizes are from 3/4 in. to over 4-1/2 in. In some high rate wells, tubing may be 5-1/2 in. to over 7 in. and 2-7/8 in. casing is run in tubingless completions. After the size is determined, the grade of the steel must be selected. The grades, along with weight, are based on pressure and corrosion requirements. The grades of steel used in oil industry tubulars
are shown in the following table for API and non-API sizes. The letters are assigned only to avoid confusion. Grades N-80 and stronger are considered high strength steels. Use of the higher strength steels increases cost and decreases resistance to some forms of corrosion. Use of the very hardalloys, such as V-150, makes packer setting difficult since the slips have difficulty setting in the very hard steel of the casing.


The yield and burst strength values for each casing size and weight are available from detailed tables are used for selection of casing once the necessary strength calculations are made. Often, because of economics or efforts to lighten the casing string, lower grade or lighter weight casing may be considered. Because the weight and pressure loads on a casing string change from top to bottom, a well designed string may incorporate several weights and grades of casing.


Casing Design Safety Factors

The design criteria for casing strings depends on the intended use and anticipated stresses. Because variance exists in both pipe manufacture and formation properties, safety factors must be incorporated into a design. The common ranges for safety factors in normal completion are shown b e l ~ w . ~ ~ ~ ~ Factors such as salt flows,7 very high pressures, sour service,8 reservoir compaction loads,g and thermal cycling'0 may change the safety factors.

tension                                               1.6 to 1.8
burst                                                 1.25 to 1.30
collapse                                            1 .O to 1.25


Earth shift forces, such as salt movement or other faulting and folding events caused by tectonic movement or are very difficult to address with a traditional safety factor. These forces have been successfully offset in some cases by designs using very heavy wall pipe or concentric pipe (casing cemented inside casing) over the affected zone. These types of casing designs are rare and most are generated by a series of trail and error approaches.

Load Description


The casing string must be designed for any load encountered from mud or reservoir fluids in placement or during any phase of stimulation or production. The common forces are tension during running, internal pressures during drilling, completion or production, and external pressures caused by drawdown, mechanical loads, and zone pressures. These loads are tension, burst, and collapse. The loads are often applied simultaneously in different parts of the string, and the forces may interact. The tension design of the casing string is made as if it were hanging free in air. A safety factor of 1.6 to 1.8 is applied to make allowances for a number of other tension factor^.^*^^'' These factors are briefly discussed in the following paragraphs. Collapse, burst, and tension forces are explained separately, but all must be satisfactorily accounted for in the final design. The design methods in this book result in a conservative design. Each design method is based on the worst possible case that could
occur during running. Collapse loading is force applied from outside the casing by either fluid pressure in a zone or earth shift forces. Forces from fluid pressure are collapse loadings while earth shift forces produce mechanical crush loadings. The largest collapse load from fluid pressure will usually be exhibited at the bottom of the string where hydrostatic pressure is greatest. The exception is an isolated, very high pressure zone. These zones are usually noted on the drilling record as places where kicks are taken.
The occurrence of earth shift zones from faults or salt movement are much harder to locate, especially on wildcats but may often show up on the drilling record as sticking points (not associated with mud cake buildup) or zones that have to be reamed or redrilled to get back to gauge hole size. The occurrence of salt zones are a very important tip to potential casing problem^.^ In one study area, 87% of the wells around a salt dome suffered some casing diameter reduction due to external, earth shift force.
’In the collapse design for fluid pressure, the worst case loading occurs with the unlikely combination of an empty casing string in a hole full of mud. A proper design, for effects of collapse only, would be a casing string that is strongest at the bottom and weakest at the top. Collapse is also affected by the effects of tension, which reduces the collapse rating or the “set depth limit” of the casing. As an object is pulled, it is more likely to lose diameter as it stretches in length. This thinning is a force in the same direction as collapse forces. Fortunately, the point at which the effect of tension induced “narrowing” of the string is at maximum is at the surface where effects of collapse pressure from hydrostatic pressure are the lowest. Burst pressure is a force applied from inside the casing by produced fluid pressures, hydrostatic mud load or addition of surface pressure during stimulation or workover operations. Since there is usually mud hydrostatic pressure along the outside of the casing before and during cementing, the net pressure or the difference between the pressure inside the casing and outside the casing will be used in the design of the casing. Unlike collapse, however, the shallower casing section is also important in the burst calculations from a safety standpoint. Burst pressures exerted by produced fluids are maximum at the surface (no offsetting hydrostatic load), while those exerted by mud is maximum at the bottom of the well. During fracturing, high burst loads may be exerted all along the string. Because collapse loads offset the burst load at the bottom of the string, the burst calculation is usually important above the “buoyancy neutral point.” This will be developed later. Tension is a force produced by the weight of the casing, the pressure differential, and the mud weights inside and outside the casing. It is largest at the top of the string and decreases with depth toward the bottom of the string. The tension load is partially offset by the buoyancy of the string in mud and is affected by pressure. When the pressure inside the tube rises, the pipe diameter is expanded and the length shortened or the tension is increased in a pipe that is anchored to prevent upward movement. When the pressure outside of a tube rises, the tube is elongated or the compression is increased if the
ends are fixed, Figure 2.6. Buckling failure in casing usually results from axial compression (lengthwise) overloading. The load produces ridges in the casing walls or corkscrewing of the tube. Either of these actions relieve compression, but the pipe is usually permanently yielded. The effects of buckling, Figure 2.7, is critical on the design of the casing string. The neutral point, Figure 2.8, is the dividing line between where buckling may occur and where it cannot occur in a tube that is evenly loaded around its radius. Above the neutral point, the tube is in tension and will not buckle. Below the neutral point, the upward buoyancy of the mud and other forces including pressure and mechanical loading place the tube in compression. Buckling can occur if the compressive load is more than the pipe can tolerate in the wellbore surroundings. The following information describes the neutral point, first in a theoretical manner and then in a practical way. There can be a neutral point in the casing or tubing string described by the formula:’*


When F, is algebraically greater than the right-hanc side of the equation, the pipe tends to be straldht. When F, is less than the equation, the pipe tends to buckle. When F, is equal to the equation, the neutral point is reached. The right-hand side of Eqn. (2.1) may also be referred to as the stability force. The true axial force will vary from point to point in the string, and will also vary over the life of the well. Typical considerations necessary to compute F, include the conditions at the time of cementing the casing or setting the packer in the case of tubing, as well as changes in the environment (temperature and pressure) to which the tubular is exposed. For casing, buckling primarily affects wear, particularly for intermediate strings through which additional drilling will occur. In extreme cases, splitting may
also be common. For tubing, the radial clearance between tubing and casing is usually sufficient to allow corkscrewing, often producing permanent deformation of the buckled portion of the string.

This equation is only appropriate for an open ended tube, clamped at both ends, with PO = 0 and AT = 0 , and ignoring weight. Under the unlikely conditions of a weightless string with no outside pressure, buckling in tension is possible. To illustrate the impact of Eqn. 2.2, consider a weightless tube that is open ended and subject to internal pressure only. For this loading, the only axial force is that due to ballooning given by Eqn. 2.2 and shown previously in Figure 2.6. As the inside pressure is increased, F, increases as 2pPjAis but the right hand side of Eqn. 2.1 increases as PjAi. The tube will not only buckle immediately, but will also buckle in tension.


Each zone or section of the casing string is checked for tensile requirements following collapse and burst calculations. In case of corrections made to a string design to compensate for tension load requirements, the order of selection is usually: (1) stronger connection, (2) higher grade (stronger steel), and (3) higher weight. Increasing connection strength and steel grade is preferred since they increase total string strength without adding significant weight. There are so many “premium” connections available that it is difficult to present a comprehensive data set. Tables of connection specifics are published yearly.37
For the sole purpose of casing collapse strength derating due to the effects of tension, a practical “buoyancy neutral point”, designated N.P., can be estimated by Eqn. (2.4) where:
The collapse resistance values given in the manufacturer tables are for casing that is not affected by axial load. In a well, the casing will be stressed by fluid pressures, Figure 2.9, mechanical bending forces, Figure 2.10, and tensile forces produced by the hanging weight of the casing. In collapse calculations, axial tension produces a reduction in collapse resistance. For purposes of this example, the axial tension is assumed to be from tension loads on a straight, free hanging pipe and not from bending loads.


Designing for forces involving earth shifts, highly deviated hole, sticking, reciprocating and rotating casing while cementing or running stresses, involves field optimization and the criteria for design differ from company to company. Earth shift design usually involves multiple strings of pipe or very heavy wall pipe across the problem zone. Problem zone recognition can often be made from drilling records where bit dragging (nonassociated with mud cake buildup) occurs long after a zone is drilled. Wells near salt domes or flows are considered likely prospects for formation movement.

Physics and Measurement lec ( 1 )


Like all other sciences, physics is based on experimental observations and quantitative measurements. The main objective of physics is to find the limited number of fundamental
laws that govern natural phenomena and to use them to develop theories that can predict the results of future experiments. The fundamental laws used in developing theories are expressed in the language of mathematics, the tool that provides a bridge between theory and experiment. When a discrepancy between theory and experiment arises, new theories must be formulated to remove the discrepancy. Many times a theory is satisfactory only under limited conditions; a more general theory might be satisfactory without such limitations. For example, the laws of motion discovered by Isaac Newton (1642–1727) in the
17th century accurately describe the motion of objects moving at normal speeds but do
not apply to objects moving at speeds comparable with the speed of light. In contrast,
the special theory of relativity developed by Albert Einstein (1879–1955) in the early 1900s gives the same results as Newton’s laws at low speeds but also correctly describes
motion at speeds approaching the speed of light. Hence, Einstein’s special theory of
relativity is a more general theory of motion. Classical physics includes the theories, concepts, laws, and experiments in classical mechanics, thermodynamics, optics, and electromagnetism developed before 1900. Important contributions to classical physics were provided by Newton, who developed classical mechanics as a systematic theory and was one of the originators of calculus as a mathematical tool. Major developments in mechanics continued in the 18th century, but the fields of thermodynamics and electricity and magnetism were not developed until the latter part of the 19th century, principally because before that time the apparatus for controlled experiments was either too crude or unavailable. A major revolution in physics, usually referred to as modern physics, began near the end of the 19th century. Modern physics developed mainly because of the discovery that many physical phenomena could not be explained by classical physics. The two most important developments in this modern era were the theories of relativity and quantum mechanics. Einstein’s theory of relativity not only correctly described the motion of objects moving at speeds comparable to the speed of light but also completely revolutionized the traditional concepts of space, time, and energy. The theory of relativity also shows that the speed of light is the upper limit of the speed of an object and that mass
and energy are related. Quantum mechanics was formulated by a number of distinguished
scientists to provide descriptions of physical phenomena at the atomic level. Scientists continually work at improving our understanding of fundamental laws, and new discoveries are made every day. In many research areas there is a great deal of overlap among physics, chemistry, and biology. Evidence for this overlap is seen in the names of some subspecialties in science—biophysics, biochemistry, chemical physics, biotechnology, and so on. Numerous technological advances in recent times are the result of the efforts of many scientists, engineers, and technicians. Some of the most notable developments in the latter half of the 20th century were
 (1) unmanned planetary explorations and manned moon landings,
 (2) microcircuitry and high-speed computers,
(3) sophisticated imaging techniques used in scientific research and medicine, and
(4) several remarkable results in genetic engineering. The impacts of such developments
and discoveries on our society have indeed been great, and it is very likely that
future discoveries and developments will be exciting, challenging, and of great benefit
to humanity.

1.1 Standards of Length, Mass, and Time

The laws of physics are expressed as mathematical relationships among physical quantities
that we will introduce and discuss throughout the book. Most of these quantities are derived quantities, in that they can be expressed as combinations of a small number of basic quantities. In mechanics, the three basic quantities are length, mass, and time. All other quantities in mechanics can be expressed in terms of these three. If we are to report the results of a measurement to someone who wishes to reproduce this measurement, a standard must be defined. It would be meaningless if a visitor from another planet were to talk to us about a length of 8 “glitches” if we do not know the meaning of the unit glitch. On the other hand, if someone familiar with our system of measurement reports that a wall is 2 meters high and our unit of length is defined to be 1 meter, we know that the height of the wall is twice our basic length unit. Likewise, if we are told that a person has a mass of 75 kilograms and our unit of mass is defined to be 1 kilogram, then that person is 75 times as massive as our basic unit.1 Whatever is chosen as a standard must be readily accessible and possess some property that can be measured reliably. Measurements taken by different people in different places must yield the same result. In 1960, an international committee established a set of standards for the fundamental quantities of science. It is called the SI (Système International), and its units of length, mass, and time are the meter, kilogram, and second, respectively. Other SI standards established by the committee are those for temperature (the kelvin), electric current (the ampere), luminous intensity (the candela), and the amount of substance (the mole).

Length

In A.D. 1120 the king of England decreed that the standard of length in his country
would be named the yard and would be precisely equal to the distance from the tip of
his nose to the end of his outstretched arm. Similarly, the original standard for the foot
adopted by the French was the length of the royal foot of King Louis XIV. This standard
prevailed until 1799, when the legal standard of length in France became the meter,
defined as one ten-millionth the distance from the equator to the North Pole along
one particular longitudinal line that passes through Paris. Many other systems for measuring length have been developed over the years, but the advantages of the French system have caused it to prevail in almost all countries and in scientific circles everywhere. As recently as 1960, the length of the meter was defined as the distance between two lines on a specific platinum–iridium bar stored under controlled conditions in France. This standard was abandoned for several reasons, a principal one being that the limited accuracy with which the separation between the lines on the bar can be determined does not meet the current
requirements of science and technology. In the 1960s and 1970s, the meter was defined
as 1 650 763.73 wavelengths of orange-red light emitted from a krypton-86 lamp. However, in October 1983, the meter (m) was redefined as the distance traveled by light in vacuum during a time of 1/299 792 458 second. In effect, this latest definition establishes that the speed of light in vacuum is precisely 299 792 458
meters per second.
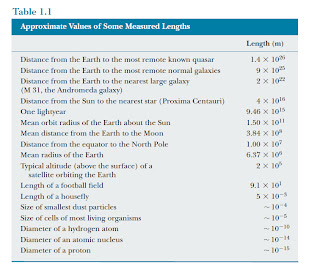
Table 1.1 lists approximate values of some measured lengths. You should study this
table as well as the next two tables and begin to generate an intuition for what is meant
by a length of 20 centimeters, for example, or a mass of 100 kilograms or a time interval
of 3.2 ! 107 seconds.

Mass

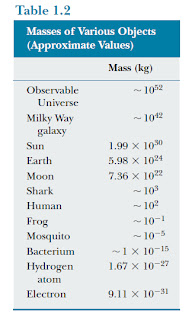
The SI unit of mass, the kilogram (kg), is defined as the mass of a specific platinum–iridium alloy cylinder kept at the International Bureau of Weights and Measures at Sèvres, France. This mass standard was established in 1887 and has not been changed since that time because platinum–iridium is an unusually stable alloy. A duplicate of the Sèvres cylinder is kept at the National Institute of Standards and Technology (NIST) in Gaithersburg, Maryland (Fig. 1.1a). Table 1.2 lists approximate values of the masses of various objects.

Time
Before 1960, the standard of time was defined in terms of the mean solar day for the
year 1900. (A solar day is the time interval between successive appearances of the Sun
at the highest point it reaches in the sky each day.) The second was defined as
of a mean solar day. The rotation of the Earth is now known to vary slightly with time, however, and therefore this motion is not a good one to use for defining a time standard.
In 1967, the second was redefined to take advantage of the high precision attainable
in a device known as an atomic clock (Fig. 1.1b), which uses the characteristic frequency
of the cesium-133 atom as the “reference clock.” The second (s) is now defined as
9 192 631 770 times the period of vibration of radiation from the cesium atom.2

To keep these atomic clocks—and therefore all common clocks and watches that are
set to them—synchronized, it has sometimes been necessary to add leap seconds to our
clocks.
Since Einstein’s discovery of the linkage between space and time, precise measurement
of time intervals requires that we know both the state of motion of the clock used
to measure the interval and, in some cases, the location of the clock as well. Otherwise,
for example, global positioning system satellites might be unable to pinpoint your location
with sufficient accuracy, should you need to be rescued.
Approximate values of time intervals are presented in Table 1.3.
In addition to SI, another system of units, the U.S. customary system, is still used in the
United States despite acceptance of SI by the rest of the world. In this system, the units of
length, mass, and time are the foot (ft), slug, and second, respectively. In this text we shall
use SI units because they are almost universally accepted in science and industry. We shall
make some limited use of U.S. customary units in the study of classical mechanics.
In addition to the basic SI units of meter, kilogram, and second, we can also use
other units, such as millimeters and nanoseconds, where the prefixes milli- and nanodenote
multipliers of the basic units based on various powers of ten. Prefixes for the
various powers of ten and their abbreviations are listed in Table 1.4. For example,
10"3 m is equivalent to 1 millimeter (mm), and 103 m corresponds to 1 kilometer
(km). Likewise, 1 kilogram (kg) is 103 grams (g), and 1 megavolt (MV) is 106 volts (V).